Friday, September 18, 2015
Unity3D Video/Movie using Sprite frames
On a Unity3D 5.x project we needed alpha blended Movies to play full screen on our app. We tried the asset store plugin MobileMovieTexture. For MobileMovieTexture to have decent performance the movies need to be fairly small, 320x240. 320x240 looks pixelated, especially on tablets. Using sprite sheet animation worked out much better for us, we were able to get as much performance as the 320x240 video but with 640x480 resolution at the cost of build size.
Here's an implementation of the Unity project described below.
Here's how to make a sprite behave more like a video:
1. Create a single image for every frame of the movie you'd like to use. I ended up doing 15 frames for every second of movie. One way to extract frames from a movie file is with an ffmpeg command: ffmpeg -i "infile.mp4" -f image2 -vf fps=fps=15 img%03d.jpg
2. (Optional) Make any modifications to the frames. For example, convert them to *.png's with transparency.
3. Import all the image file frames into your unity project.
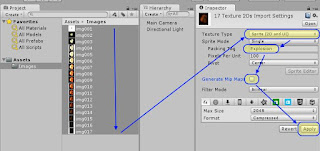
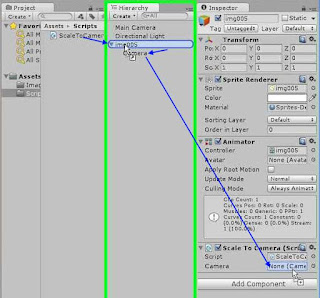
4. In Unity's project window, shift-select all of the frames at once to bring up their properties in the inspector.
4.1. Change the Texture Type to "Sprite (2D and UI)"
4.2. Change the Packing Tag to the name of the movie. This name does some behind the scenes optimization by putting all these frames are on a single sprite sheet or image atlas without any other sprites.
4.3. Make sure "Generate Mip Maps" is unchecked. Mip Maps take up space that we won't be using as the sprites will stay the same distance from the camera.
4.4. Press "Apply".
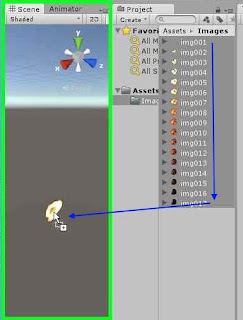
5. From the project window drag the selection of all the frames together into the scene view. This causes Unity's 2D engine to auto-generate an animator and sprite animation using all selected frames.
6. Change the animation to match the FPS you specified in step #1.
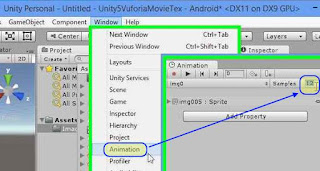
Hit the Editors play button you should see your video play.
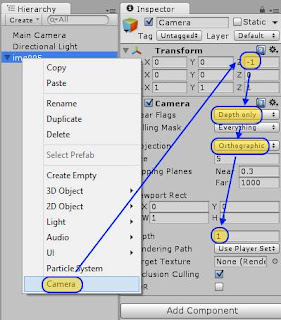
7.1. Offset it's position from the sprite by setting z-position to -1
7.2. Clear Flags: Depth - this allows other content to be rendered underneath what this camera see's
7.3. Projection: orthographic - using orthographic makes calculating the screen size easier
7.4. Depth: 1 - tells unity to render this camera above the main camera
8. Create ScaleToCamera.cs script
8.2. Drag the camera you created in step #7 to the Camera property in the ScaleToCamera component.
Hit the Editors play button you should see your video re-size to the game window and play.
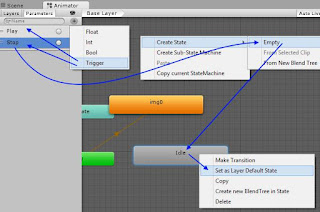
10. In the animator, add an "Idle" or "Stop" empty state. This is the state where the animation won't be playing.
10.1. Right click this state to set it as the default state.
10.2. Set this state to play the same animation file as the other state. 10.3. Set this state's animation play speed to 0. This makes the video always show only the first frame of the video when this state is active.
11. Add 2 Triggers to the animator; "Play" and "Stop"
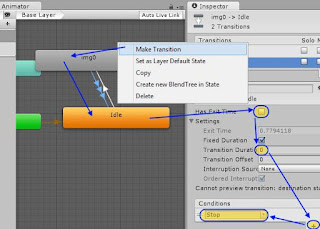
12. Create a transition from "Idle" to the generated state using the condition "Play", uncheck exit time, set Transition Duration to 0.
13. Create a transition from the generated state back up to "Idle" using the condition "Stop", uncheck exit time, set Transition duration to 0
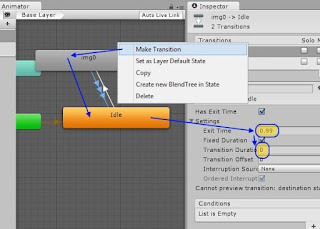
14. Create a second transition from the generated state back up to "Idle" leaving Exit Time checked, set exit time to 0.99, set Transition duration to 0
15. Add TransitionSprite.cs to the spriteRenderer
Now when you press the Unity3D editor's play button the video won't play until you click in the game window, clicking again will stop the video.
Here's the code above as a Unity project.
Here's an implementation of the Unity project described below.
Here's how to make a sprite behave more like a video:
1. Create a single image for every frame of the movie you'd like to use. I ended up doing 15 frames for every second of movie. One way to extract frames from a movie file is with an ffmpeg command: ffmpeg -i "infile.mp4" -f image2 -vf fps=fps=15 img%03d.jpg
2. (Optional) Make any modifications to the frames. For example, convert them to *.png's with transparency.
3. Import all the image file frames into your unity project.
4. In Unity's project window, shift-select all of the frames at once to bring up their properties in the inspector.
4.1. Change the Texture Type to "Sprite (2D and UI)"
4.2. Change the Packing Tag to the name of the movie. This name does some behind the scenes optimization by putting all these frames are on a single sprite sheet or image atlas without any other sprites.
4.3. Make sure "Generate Mip Maps" is unchecked. Mip Maps take up space that we won't be using as the sprites will stay the same distance from the camera.
4.4. Press "Apply".

5. From the project window drag the selection of all the frames together into the scene view. This causes Unity's 2D engine to auto-generate an animator and sprite animation using all selected frames.

6. Change the animation to match the FPS you specified in step #1.

Hit the Editors play button you should see your video play.
Full Screen Video
7. Add a camera as a child to the sprite and give it the following settings7.1. Offset it's position from the sprite by setting z-position to -1
7.2. Clear Flags: Depth - this allows other content to be rendered underneath what this camera see's
7.3. Projection: orthographic - using orthographic makes calculating the screen size easier
7.4. Depth: 1 - tells unity to render this camera above the main camera

8. Create ScaleToCamera.cs script
using UnityEngine;

public class ScaleToCamera : MonoBehaviour
{
    public new Camera camera;
    private SpriteRenderer spriteRenderer;

    void Start()
    {
        if (camera == null) camera = Camera.main;

        spriteRenderer = this.GetComponent<SpriteRenderer>();
        if (spriteRenderer != null)
        {
            scaleSprite();
        }
    }

    private void scaleSprite()
    {
        if (camera.orthographic == false)
        {
            Debug.Log(this.name + " can't run ScaleToCamera.cs. Sprite scaling calculation is only implemented for an orthographic camera.");
            return;
        }

        float worldScreenHeight = camera.orthographicSize * 2;
        float worldScreenWidth = worldScreenHeight / Screen.height * Screen.width;

        transform.localScale = new Vector3(
            worldScreenWidth / spriteRenderer.sprite.bounds.size.x,
            worldScreenHeight / spriteRenderer.sprite.bounds.size.y,
            1);
    }
}
8.1. Add ScaleToCamera script to the sprite renderrer to have the video stretch to full screen.8.2. Drag the camera you created in step #7 to the Camera property in the ScaleToCamera component.

Hit the Editors play button you should see your video re-size to the game window and play.
Adding Play/Stop control
9. Turn off looping in the animation file that was automatically generated in step #5.10. In the animator, add an "Idle" or "Stop" empty state. This is the state where the animation won't be playing.
10.1. Right click this state to set it as the default state.
10.2. Set this state to play the same animation file as the other state. 10.3. Set this state's animation play speed to 0. This makes the video always show only the first frame of the video when this state is active.
11. Add 2 Triggers to the animator; "Play" and "Stop"

12. Create a transition from "Idle" to the generated state using the condition "Play", uncheck exit time, set Transition Duration to 0.
13. Create a transition from the generated state back up to "Idle" using the condition "Stop", uncheck exit time, set Transition duration to 0
14. Create a second transition from the generated state back up to "Idle" leaving Exit Time checked, set exit time to 0.99, set Transition duration to 0
15. Add TransitionSprite.cs to the spriteRenderer
using UnityEngine;
using System;

[RequireComponent(typeof(Animator))]
public class TransitionSprite : MonoBehaviour
{
    /// <summary> The sprite animation has stopped playing, either from finishing or from running Stop() </summary>
    public event EventHandler<EventArgs> Finished;

    private Animator cachedAnimator;
    private bool debugToggle;

    void Start()
    {
        cachedAnimator = this.GetComponent<Animator>();
    }

    void Update()
    {
        // Note: this if block is used only for debugging purposes,
        if (Input.GetButtonDown("Fire1"))
        {
            debugToggle = !debugToggle;
            if (debugToggle)
                Play();
            else
                Stop();
        }
    }

    /// <summary> Plays the animation from the start to the end. </summary>
    public void Play()
    {
        cachedAnimator.ResetTrigger("Stop"); // clear stop to make sure the animation won't stop as soon as it starts.
        cachedAnimator.SetTrigger("Play");
    }

    public void Stop()
    {
        cachedAnimator.ResetTrigger("Play"); // clear play to make sure the animation won't play as soon as it stops.
        cachedAnimator.SetTrigger("Stop");
    }

    public void RaiseFinished()
    {
        Debug.Log("Finished playing " + this.name);
        if (Finished != null)
        {
            Finished(this, new EventArgs());
        }
    }
}
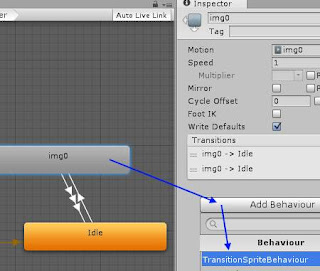
16. Add TransitionSpriteBehaviour.cs to the spriteRenderer's animator's generated state.using UnityEngine;
public class TransitionSpriteBehaviour : StateMachineBehaviour
{
// OnStateExit is called when a transition ends and the state machine finishes evaluating this state
override public void OnStateExit(Animator animator, AnimatorStateInfo stateInfo, int layerIndex)
{
var sprite = animator.GetComponent<TransitionSprite>();
if (sprite != null)
{
sprite.RaiseFinished();
}
}
}

Now when you press the Unity3D editor's play button the video won't play until you click in the game window, clicking again will stop the video.
Here's the code above as a Unity project.
Labels: Unity3D
Comments:
<< Home
Mr Benjamin went above and beyond their requirements to assist me with my loan which I used to expand my pharmacy business,They were friendly, professional, and absolute gems to work with.I will recommend anyone looking for loan to contact. 247officedept@gmail.com.WhatsApp ... + 19893943740.
Post a Comment
# posted by  : 8:16 PM
: 8:16 PM Subscribe to Post Comments [Atom]
<< Home
![]()
Subscribe to Posts [Atom]