Friday, September 18, 2015
Unity3D Video/Movie using Sprite frames
On a Unity3D 5.x project we needed alpha blended Movies to play full screen on our app. We tried the asset store plugin MobileMovieTexture. For MobileMovieTexture to have decent performance the movies need to be fairly small, 320x240. 320x240 looks pixelated, especially on tablets. Using sprite sheet animation worked out much better for us, we were able to get as much performance as the 320x240 video but with 640x480 resolution at the cost of build size.
Here's an implementation of the Unity project described below.
Here's how to make a sprite behave more like a video:
1. Create a single image for every frame of the movie you'd like to use. I ended up doing 15 frames for every second of movie. One way to extract frames from a movie file is with an ffmpeg command: ffmpeg -i "infile.mp4" -f image2 -vf fps=fps=15 img%03d.jpg
2. (Optional) Make any modifications to the frames. For example, convert them to *.png's with transparency.
3. Import all the image file frames into your unity project.
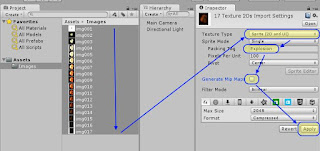
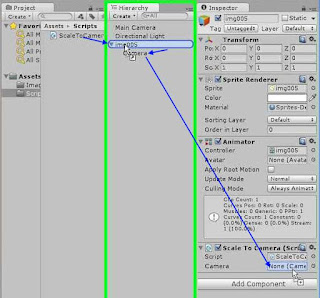
4. In Unity's project window, shift-select all of the frames at once to bring up their properties in the inspector.
4.1. Change the Texture Type to "Sprite (2D and UI)"
4.2. Change the Packing Tag to the name of the movie. This name does some behind the scenes optimization by putting all these frames are on a single sprite sheet or image atlas without any other sprites.
4.3. Make sure "Generate Mip Maps" is unchecked. Mip Maps take up space that we won't be using as the sprites will stay the same distance from the camera.
4.4. Press "Apply".
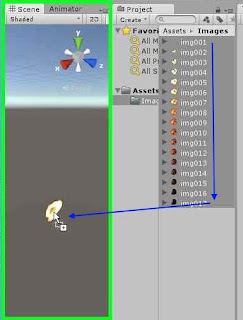
5. From the project window drag the selection of all the frames together into the scene view. This causes Unity's 2D engine to auto-generate an animator and sprite animation using all selected frames.
6. Change the animation to match the FPS you specified in step #1.
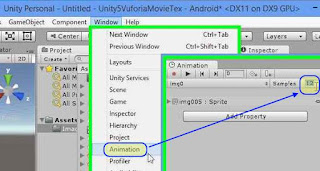
Hit the Editors play button you should see your video play.
7.1. Offset it's position from the sprite by setting z-position to -1
7.2. Clear Flags: Depth - this allows other content to be rendered underneath what this camera see's
7.3. Projection: orthographic - using orthographic makes calculating the screen size easier
7.4. Depth: 1 - tells unity to render this camera above the main camera
8. Create ScaleToCamera.cs script
8.2. Drag the camera you created in step #7 to the Camera property in the ScaleToCamera component.
Hit the Editors play button you should see your video re-size to the game window and play.
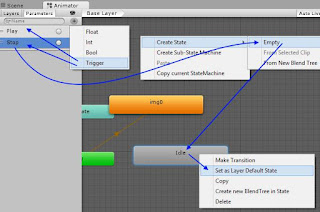
10. In the animator, add an "Idle" or "Stop" empty state. This is the state where the animation won't be playing.
10.1. Right click this state to set it as the default state.
10.2. Set this state to play the same animation file as the other state. 10.3. Set this state's animation play speed to 0. This makes the video always show only the first frame of the video when this state is active.
11. Add 2 Triggers to the animator; "Play" and "Stop"
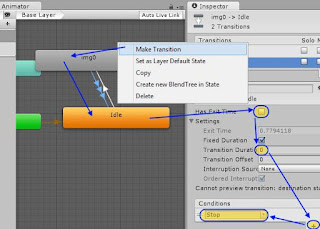
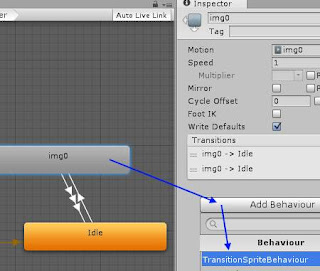
12. Create a transition from "Idle" to the generated state using the condition "Play", uncheck exit time, set Transition Duration to 0.
13. Create a transition from the generated state back up to "Idle" using the condition "Stop", uncheck exit time, set Transition duration to 0
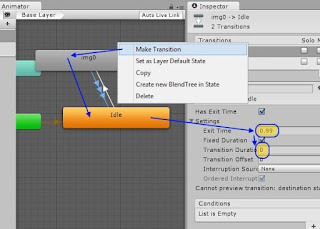
14. Create a second transition from the generated state back up to "Idle" leaving Exit Time checked, set exit time to 0.99, set Transition duration to 0
15. Add TransitionSprite.cs to the spriteRenderer
Now when you press the Unity3D editor's play button the video won't play until you click in the game window, clicking again will stop the video.
Here's the code above as a Unity project.
Here's an implementation of the Unity project described below.
Here's how to make a sprite behave more like a video:
1. Create a single image for every frame of the movie you'd like to use. I ended up doing 15 frames for every second of movie. One way to extract frames from a movie file is with an ffmpeg command: ffmpeg -i "infile.mp4" -f image2 -vf fps=fps=15 img%03d.jpg
2. (Optional) Make any modifications to the frames. For example, convert them to *.png's with transparency.
3. Import all the image file frames into your unity project.
4. In Unity's project window, shift-select all of the frames at once to bring up their properties in the inspector.
4.1. Change the Texture Type to "Sprite (2D and UI)"
4.2. Change the Packing Tag to the name of the movie. This name does some behind the scenes optimization by putting all these frames are on a single sprite sheet or image atlas without any other sprites.
4.3. Make sure "Generate Mip Maps" is unchecked. Mip Maps take up space that we won't be using as the sprites will stay the same distance from the camera.
4.4. Press "Apply".

5. From the project window drag the selection of all the frames together into the scene view. This causes Unity's 2D engine to auto-generate an animator and sprite animation using all selected frames.

6. Change the animation to match the FPS you specified in step #1.

Hit the Editors play button you should see your video play.
Full Screen Video
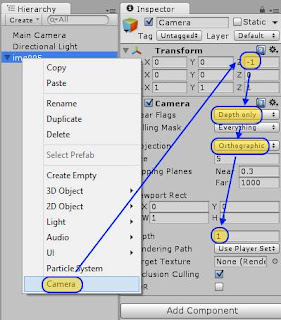
7. Add a camera as a child to the sprite and give it the following settings7.1. Offset it's position from the sprite by setting z-position to -1
7.2. Clear Flags: Depth - this allows other content to be rendered underneath what this camera see's
7.3. Projection: orthographic - using orthographic makes calculating the screen size easier
7.4. Depth: 1 - tells unity to render this camera above the main camera

8. Create ScaleToCamera.cs script
using UnityEngine;

public class ScaleToCamera : MonoBehaviour
{
    public new Camera camera;
    private SpriteRenderer spriteRenderer;

    void Start()
    {
        if (camera == null) camera = Camera.main;

        spriteRenderer = this.GetComponent<SpriteRenderer>();
        if (spriteRenderer != null)
        {
            scaleSprite();
        }
    }

    private void scaleSprite()
    {
        if (camera.orthographic == false)
        {
            Debug.Log(this.name + " can't run ScaleToCamera.cs. Sprite scaling calculation is only implemented for an orthographic camera.");
            return;
        }

        float worldScreenHeight = camera.orthographicSize * 2;
        float worldScreenWidth = worldScreenHeight / Screen.height * Screen.width;

        transform.localScale = new Vector3(
            worldScreenWidth / spriteRenderer.sprite.bounds.size.x,
            worldScreenHeight / spriteRenderer.sprite.bounds.size.y,
            1);
    }
}
8.1. Add ScaleToCamera script to the sprite renderrer to have the video stretch to full screen.8.2. Drag the camera you created in step #7 to the Camera property in the ScaleToCamera component.

Hit the Editors play button you should see your video re-size to the game window and play.
Adding Play/Stop control
9. Turn off looping in the animation file that was automatically generated in step #5.10. In the animator, add an "Idle" or "Stop" empty state. This is the state where the animation won't be playing.
10.1. Right click this state to set it as the default state.
10.2. Set this state to play the same animation file as the other state. 10.3. Set this state's animation play speed to 0. This makes the video always show only the first frame of the video when this state is active.
11. Add 2 Triggers to the animator; "Play" and "Stop"

12. Create a transition from "Idle" to the generated state using the condition "Play", uncheck exit time, set Transition Duration to 0.
13. Create a transition from the generated state back up to "Idle" using the condition "Stop", uncheck exit time, set Transition duration to 0
14. Create a second transition from the generated state back up to "Idle" leaving Exit Time checked, set exit time to 0.99, set Transition duration to 0
15. Add TransitionSprite.cs to the spriteRenderer
using UnityEngine;
using System;

[RequireComponent(typeof(Animator))]
public class TransitionSprite : MonoBehaviour
{
    /// <summary> The sprite animation has stopped playing, either from finishing or from running Stop() </summary>
    public event EventHandler<EventArgs> Finished;

    private Animator cachedAnimator;
    private bool debugToggle;

    void Start()
    {
        cachedAnimator = this.GetComponent<Animator>();
    }

    void Update()
    {
        // Note: this if block is used only for debugging purposes,
        if (Input.GetButtonDown("Fire1"))
        {
            debugToggle = !debugToggle;
            if (debugToggle)
                Play();
            else
                Stop();
        }
    }

    /// <summary> Plays the animation from the start to the end. </summary>
    public void Play()
    {
        cachedAnimator.ResetTrigger("Stop"); // clear stop to make sure the animation won't stop as soon as it starts.
        cachedAnimator.SetTrigger("Play");
    }

    public void Stop()
    {
        cachedAnimator.ResetTrigger("Play"); // clear play to make sure the animation won't play as soon as it stops.
        cachedAnimator.SetTrigger("Stop");
    }

    public void RaiseFinished()
    {
        Debug.Log("Finished playing " + this.name);
        if (Finished != null)
        {
            Finished(this, new EventArgs());
        }
    }
}
16. Add TransitionSpriteBehaviour.cs to the spriteRenderer's animator's generated state.using UnityEngine;
public class TransitionSpriteBehaviour : StateMachineBehaviour
{
// OnStateExit is called when a transition ends and the state machine finishes evaluating this state
override public void OnStateExit(Animator animator, AnimatorStateInfo stateInfo, int layerIndex)
{
var sprite = animator.GetComponent<TransitionSprite>();
if (sprite != null)
{
sprite.RaiseFinished();
}
}
}

Now when you press the Unity3D editor's play button the video won't play until you click in the game window, clicking again will stop the video.
Here's the code above as a Unity project.
Labels: Unity3D
Sunday, March 02, 2014
Getting started with StrangeIoC
StrangeIoC is a design pattern enabler for Unity3D projects. It focuses on decoupling logic from presentation through the use of Inversion of Control. This idea is summed up well in this old (2008) but well explained hour long video: http://www.dnrtv.com/default.aspx?showNum=126
Unity3D game objects are the MVVM View, the XAML & Codebehind
StrangeIoC ContextView, Root GameObject & MvcsContext are the binding of the MVVM View to the ViewModel, aka XAML's DataContext
StrangeIoC View and Mediator is the MVVM ViewModel, what's bound to XAML DataContext
StrangeIoC Model/Service is the MVVM Model
The initialization of a GameObject's modifiable properties should be pulled from a model and put into a view. There are views for many GameObjects inside a single context. This should also be represented in the Unity3D Hierarchy by making GameObjects with a view be children of a GameObject with a context. We need a context GameObject in the Unity3D Hierarchy. Our cube either needs a parent empty GameObject with a CubeContext.cs component or to become an empty GameObject and have a child Cube object. We'll also need a new CubeView.cs script. This is what our GameObject Hierarchy should look like:
StrangeIoC compared to MVVM in XAML
I come from a XAML background, where MVVM is the popular pattern. Some initial mapping of StrangeIoC to something I'm familiar with helped me get a grasp of its goals. This is how I found MVVM maps to StrangeIoC:Unity3D game objects are the MVVM View, the XAML & Codebehind
StrangeIoC ContextView, Root GameObject & MvcsContext are the binding of the MVVM View to the ViewModel, aka XAML's DataContext
StrangeIoC View and Mediator is the MVVM ViewModel, what's bound to XAML DataContext
StrangeIoC Model/Service is the MVVM Model
How StrangeIoC gets started
The first hook into StrangeIoC is a top level GameObject from the Unity3D Scene Hierarchy. The \examples\Assets\scenes\myfirstproject\TestView.unity example that comes with strange shows this on the "ViewGO" gameobject with its MyFirstProjectRoot.cs component script. The purpose of this Root.cs script is to define and initialize a StrangeIoC context. This is explained with detail in the StrangeIoC How-To. I was looking for something with a little less detail to get started.Building a Unity3D app with rudimentary usage of StrangeIoC
I made a top level Cube gameObject and attached a CubeRoot.cs script to it:using strange.extensions.context.impl;
public class CubeRoot : ContextView
{
void Awake()
{
context = new CubeContext(this);
}
}
The CubeContext is the mapping container for all StrangeIoC objects. It's not used correctly in the code below, as no mapping is done. This usage instead allows you to test that you have StrangeIoC included in your project correctly.using UnityEngine;
using strange.extensions.context.impl;
using strange.extensions.context.api;
public class CubeContext : MVCSContext
{
public CubeContext(MonoBehaviour view) : base(view)
{
view.renderer.material.color = Color.yellow; //verify view loads it's context
}
}
You now have a completed basic framework for StrangeIoC. You can run the project. The cube should change to yellow by using its context.Following a pattern by using injection
The constructor of the context class is not the right place for making modifications to the view. The purpose of the Context is to define mappings between the MVCS layers and to define the scope where GameObjects can send or receive events from other GameObject.The initialization of a GameObject's modifiable properties should be pulled from a model and put into a view. There are views for many GameObjects inside a single context. This should also be represented in the Unity3D Hierarchy by making GameObjects with a view be children of a GameObject with a context. We need a context GameObject in the Unity3D Hierarchy. Our cube either needs a parent empty GameObject with a CubeContext.cs component or to become an empty GameObject and have a child Cube object. We'll also need a new CubeView.cs script. This is what our GameObject Hierarchy should look like:
- Context - Only transform and CubeContext.cs components.
- Cube - Has default cube components along with CubeView.cs script.
using UnityEngine;
using strange.extensions.context.impl;
using strange.extensions.context.api;

public class CubeContext : MVCSContext
{
 public CubeContext(MonoBehaviour view) : base(view) { }

 protected override void mapBindings()
 {
  injectionBinder.Bind().To(Color.red); // map binding to a model
 }
}
For the sake of simplicity, I hijacked the Color datatype, using Color as our Model. The Color type would normally be replaced with a model interface and injected with a model that uses that interface. The CubeView makes use of the bindings defined in CubeContext.cs to inject the CubeColor from the model.using UnityEngine;
using strange.extensions.mediation.impl;
public class CubeView : View
{
[Inject]
public Color CubeColor {get; set;}
protected override void Start()
{
base.Start();
this.renderer.material.color = CubeColor;
}
}
There is much more to StrangeIoC than just these fundamentals. Understanding the flow above will make the StrangeIoC How-To easier to digest. There is also an introductory video on StrangeIoC in this article.Labels: StrangeIoC, Unity3D
Monday, June 10, 2013
Deploying to Android with Unity3D
Want to build Android games in C# or javascript without learning Java? Doing it in Unity3D is free. Yet getting Unity3D setup for Android deployments was tricky the first time I did it. It was even more of a challenge when I did it the 2nd time 4 months later. Hopefully these steps will make it easier for you or for when my third time comes around.
1. Download the Android SDK Tools, not the ADT Bundle! The SDK is shown under "use an Existing IDE". http://developer.android.com/sdk/index.html
2. Run the SDK Tools.
2.1 If the Android SDK Tools request it, install the 32bit version of the Java Platform Standard Edition JDK. (Installing only the 64bit version causes Unity Error: Error building Player: Win32Exception: ApplicationName='java.exe', CommandLine='-Xmx1024M...) http://www.oracle.com/technetwork/java/javase/downloads/index.html
2.2 You may need to manually set the JAVA_HOME Windows PATH variable https://confluence.atlassian.com/display/CONF26/Set+JAVA_HOME+variable+in+Windows
3. After the Android SDK has been installed be sure to start "SDK Manager.exe" from the installation folder.
3.1 Keep the defaults checked and check any additional Android versions that your older devices are running.
3.2 Click "Install ## packages..." in the lower right.
3.3 Accept the license and install. (It took me about 20 minutes for this to install 13 packages).
3.4 You do not need System Images to create an *.apk with Unity. However, dependencies for System Image packages are now complete, click "Install #packages..." again if you want to use the Android emulator.
3.5 [troubleshooting] If the Android SDK *.exe you downloaded contains r22 in it's file name (and you want to use Unity 4.1.3) you need to copy the contents of the /build-tools/17.0.0/ folder to the /platform-tools/ folder. This was suggested by "jvil" on http://forum.unity3d.com/threads/176737-unknown-error-when-building-simple-scene
4. Start up Unity3D and open Edit -> Preferences...
4.1 Click External Tools
4.2 Click Browse... next to "Android SDK Location"
4.3 Find the same folder that "SDK Manager.exe" is in from step #3 and click "Select Folder".
4.4 exit the Preferences window.
5. Click File -> "Build Settings..."
5.1 Make sure platform "Android" is selected.
5.2 Click "Player Settings..."
5.3 Find the Unity Inspector -> Per-Platform Settings -> Settings for Android -> "Other Settings".
5.4 Set the "Bundle Identifier" and "Minimum API Level".
6. Click File -> "Build Settings..." if you closed it.
6.1 Click Platform "Android".
6.2 Click "Switch Platform"
6.3 Click Build
Additional details for setting up the Android SDK to work with a device and creating a test application: http://blog.rabidgremlin.com/2012/03/10/tutorial-creating-your-first-unity-android-app/
Wednesday, March 06, 2013
Using Version Control when learning Unity3D
I've been looking for what I think may be the next up and coming browser plug-in and all around multi-platform framework.
I got started learning Unity3D during the end of January 2013. Using the last version of Unity 3.x, Unity 3.5.7. There are lots of great tutorials out there, from the corny tornado twins (http://www.youtube.com/playlist?list=PL11F87EB39F84E292), to the overly detailed cgcookie.com.
The biggest hurtle for me was figuring out source control. What files should be versioned and which shouldn't.
- The most important thing to do is to turn on Meta Files at the start of a new project. Inside Unity3D go to Edit->Project Settings->Editor and change Mode from "Disabled" to "Meta Files". This allows Unity to no longer relay on any of the contents of a Unity3D projects Library folder.
- If everyone on your team has Unity Pro licence, you should also set Asset Serialization to "Force Text". This stores asset files in an xml form. This allows a source control conflict of asset files to be resolvable.
- Unity3D does some unexpected things like re-generating the VisualStudio *.sln and *.csproj files. I'm not sure when the re-generation happens, but the key take-away was that *.sln and *.csproj related to the unity project should not be under version control. However, *.sln and *.csproj files not connected to Unity, like a Unit Test project, should still be under version control.
### start Unity3D .gitignore
# The Unity3D /Library/* ignore requires Meta Files to be turned on (Enable Meta files in Edit->Project Settings->Editor)
# ref: http://docs.unity3d.com/Documentation/Manual/ExternalVersionControlSystemSupport.html
*.unityproj
*.DS_Store
/Build/*
/Library/*
/[Oo]bj/*
/[Tt]emp/*

# VisualStudio specific files that are generated by Unity3D
/*.sln
/*.csproj
# Include other VisualStudio projects like Unit Test projects by uncommenting and customizing the next line
#!/UnitTests/*.csproj

#pidb files are only for code completion caching data according to:
# http://stackoverflow.com/questions/1022111/what-are-monodevelops-pidb-files
rpsUnity3D/*.pidb
rpsUnity3D/*.userprefs
### end Unity3D .gitignore
![]()
Subscribe to Posts [Atom]