Friday, August 31, 2018
Unity3D & spatially based audio reverb
OculusSpatializerReflection setup
To set up OculusSpatializerReflection from a completely empty Unity project:- Edit -> Project Settings -> Audio -> spatializer Plugin should be set to OculusSpatializer
- In the project panel, Right click -> Create -> Audio Mixer
- Add an OculusSpatializerReflection effect to the Master channel of the AudioMixer that you just created. Then setup that effect to be a very reflective hallway using the following properties:
GScale: 1 - this value is essentially a multiplier from the Room XYZ
E.Rflt On: 1 - E.Rflt stands for Early Reflections. They help bring out the spatial aspect of the reverb
E.Rflt Rev On: 1
Room X: 16 - Here you want the room to be like a big church. The algorithm doesn't handle long hallways well.
Room Y: 16
Room Z: 16
Left: 0.97
Right: 0.97
Up: 0.97
Down: 0.97
Behind:0.97
Front: 0.97
Shared Rev Min: 1
Shared Rev Max: 10000 - This seems to be the value corresponding to when echos get cutoff. Maximize this to ensure you get as few echo cutoff as possible.

- Create a new scene, the camera should be left at it's default position of 0, 1, -10
- Add an empty game object at 0,0,0 that has an AudioSource component with:
AudioClip: set to any audioclip you want to test with, vocal1.ogg from the OculusNativeSpatializer.unitypackage worked well for this
Output: Master (This is the channel of the audio mixer you created in step #2)
Spatial Blend: 1
Spatialize: checked


Sunday, January 21, 2018
Unity3d Video Editing
Goal
How to use Unity3D 2017.x+ to make *.mp4s with overlaid text.
Update: The next day I stumbled on an Asset Store tool that does the exporting to an *.mp4 for you.Why I didn’t go with Blender
I wanted to make a Facebook style video to run an ad. Which means take an existing video and overlay some text so that the video had some meaning when it was played without audio. Initially I tried to use Blender as I thought it’d be a great way for me to learn that tool. Plus, there are tons of tutorials on how to use Blender for video editing. Halfway through my first attempt I decided to find a way other than Blender due to:
- Blenders text overlay feature is difficult to work with. Overlaid strings of text can not be multi-line.
- I couldn’t figure out how to copy the animated graph window parts text objects, meaning my 4 pieces of text which each had 4 lines of text would require redoing my animated graph fade work 16 times.
- I once found a way Blender scrubbing a video wouldn’t be choppy on a low end computer, I was unable to re-find this method. Upping Blenders RAM usage wasn’t enough.
Why I went with Unity3D
Unity3D I was already familiar with. Yet I couldn’t find a single guide on how to use it to create *.mp4s. I realized I could use a screen recorder, like ObsStudio, to encode the output to an *.mp4. The more I thought about it the better Unity3D seemed to fit:
- Unity3D has pretty good UI tools.
- Unity3D 5.6 introduced a new VideoPlayer component.
- Unity3D 2017.1 introduced a new TimeLine tool.
Setting up Unity3D
Source Video
All we’re going to do is overlay text ontop of an already composed video. The first step is to make sure our video plays correctly in Unity3D. These steps were taken from a section of this youtube video: https://youtu.be/V8rwCWiRLWI?t=2m53s
- Start a new Unity3D project / scene
- Drop an *.mp4 source video file in the Unity3d project window. This will be the background video our text we be overlaid upon.
- Add a VideoPlayer component to an empty game object.
- Drag *.mp4 clip onto video player component.
- On the VideoPlayer component change Render Mode to “Camera Far Plane”.
- Drag the Main Camera into the Camera slot in VideoPlayer.
- Add an AudioSource component to the same VideoPlayer game object.
- Drag that AudioSource component into the Audio Source field of the VideoPlayer component.
Creating Text Objects
I wanted text to fade in over half a second, display for 5.5 seconds, then fade out over half a second.
- Add GameObject > UI > Text.
- To set the text to use the full view, open the Rect Transform’s red cross-hair positioning icon. Hold shift+alt and click the popup windows bottom right icon.
- In the Text component set the font size and Paragraph Alignment to what you prefer. Set the color to white.
- Add an Outline component to help the text stand out from your video. Set the alpha of the outlines’ black to 255.
- Add a Canvas Group component to this text.
- Make sure the Text object is selected in your hierarchy. Then open the Animation window and click “Create”.
- Click the red circle record button in the Animation window.
- Make sure the play head is at 0 and change the Texts’ Canvas Group components Alpha value to 0.
- Move the play head to 0:30 (half a second) and put the Alpha value back to 1.
- Scroll out until you see 6:30 on the animation track.
- In the Canvas Group.Alpha row right click under 6:00 and “Add Key”.
- Move the play head to 6:30 and set the Alpha back to 0.
- Turn off record mode and press the play preview button to make sure the fade works correctly.
- Find the saved *.anim file in the Project explorer. Click it to uncheck “Loop Time” in the inspector. This will make sure the same text isn’t shown again after it’s played once.
- Copy the text component as many times as you need with Ctrl+D. Change each one’s text to match what you want it to say.
- Disable all text gameobjects, they’ll be enabled by the timeline below.
Setting when text gets shown
The timeline feature of Unity 2017 is great for timing which objects are shown when. With how our text objects are setup all we need to do is enable them at the correct time.
- In Unity3D go to Window > Timeline
- Create a new empty gameobject called “Timeline”
- Click “Create” in the Timeline window
- Save it as TextTiming.playable
- Delete its only row, which should have a blue cap on the left (animation track) and contain a reference to the Timeline game object
- Add an Activation track to the timeline.
- Click the settings cog in the upper right of the Timeline window and change the view to Seconds instead of Frames.
- Resize the Activation track’s Active to be 8 seconds long
- Select the Activation track and press Ctrl+D for each copy of the Text object you created.
- Drag one Text object to each Activation track
- Move their Active components to start when the previous ends. It should look like a staircase.
- Extend the last Texts Active track to be as long as your video. Otherwise all text gameobjects activate.
Now when you press the Unity Editors play button you should see your video play with text being overlaid. You’re ready to record an *.mp4!
Setting up ObsStudio
To setup the video resolution in ObsStudio go to Settings > Video > Base Resolution. Here I also set “Common FPS Values” to “30”.
Next decide how the file will be saved in Settings > Output by setting its’ “Recording Path” and “Recording Format”
Recording from the “game” view in the Unity3D editor worked great for me. I made sure the Unity3D game window was also locked to the correct resolution by changing the resolution from “Free Aspect” to match the value I put in ObsStudios’ “Base Resolution”. More details on the game view control bar at https://docs.unity3d.com/Manual/GameView.html
Under Sources add a Display Capture. This shouldn’t show your entire monitor’s contents as long as you set the Base Resolution smaller than your monitors resolution. You do not want to scale the video with the red box handles, instead you want to pan it to the right part of the monitor by left clicking any part of the display view and dragging.
Recording
- Made sure the Unity3D game window was bigger than the set video resolution.
- Set the edge of the game view against the right edge of my monitor.
- In ObsStudio made sure the game window was centered in the display
- Pressed the “Start Recording” button in ObsStudio.
- Pressed play in Unity3D
- Waited until it played through what I wanted
- Pressed “Stop Recording” in ObsStudio
Video trimming
I used Windows 10 Photos to trim the video. Open the *.mp4 with Windows 10 Photos then use the edit tools in the upper right to easily define the trim. More details at http://www.tech-recipes.com/rx/56780/trim-videos-windows-10-photos/
Completed video editing unity scene.
Written with StackEdit.
Tuesday, April 04, 2017
uNet High Level API clients sharing objects
The goal of Unity3D's uNet HL(HighLevel)API is to sync an experience across multiple clients. This differs from uNets' low level networking in that the HLAPI delegates network tasks through a spawned prefab that inherits from NetworkBehaviour. Syncing is done through this prefab created for each player as soon as they join a server. Keeping a shared variable or gameobject sync'd between clients, using the HLAPI, also needs to be accomplished through the prefab spawned in by the HLAPI. The clients prefab sends a message to the server that it wants to update a shared resource. The server then makes an RPC call for all clients to update their copy of the shared resource. To illustrate the flow, lets update a shared variable (instead of a gameobject).
When the following NetworkBehaviour is used as the prefab being spawned by the HLAPI, a SharedIntExample variable will be synced across the server and all clients. Whenever a player updates their copy a message is sent to all other clients to get their copies of the variable to match, via the server.public class NetworkSession : NetworkBehaviour
{
public static int SharedIntExample;
void Update()
{
// only do something if the local player is doing it. CmdUpdateShare() calling RpcShareUpdate() will make sure everyone else sees it
if (isLocalPlayer && Input.GetMouseButtonDown(0))
{
CmdUpdateShare(SharedIntExample + 1); // define how the value should be updated, in this case increment by 1
}
}
[Command]
void CmdUpdateShare(int newValue)
{
RpcShareUpdate(newValue); // use a Client RPC function to update the value on all clients
}
[ClientRpc]
void RpcShareUpdate(int newValue)
{
SharedIntExample = newValue;
}
}
This works great. You can check it by binding a UnityEngine.UI.Text field to the NetworkSession.SharedIntExample (the only reason this int is static is for ease of testing its value). It's great, unless a client joins after the variable has already been updated. Luckily, requesting a refresh to all clients is easy. Add these two functions to the NetworkSession class above.
    private void Start()
    {
        CmdNewClient();
    }

    [Command]
    void CmdNewClient()
    {
        RpcShareUpdate(SharedIntExample);
    }
Not all clients needed a refresh. Only the newly joining client needed that update. Specifying an update to a single client isn't too difficult if you make use of the newer [TargetRpc] attribute. https://docs.unity3d.com/ScriptReference/Networking.TargetRpcAttribute.html Here we update CmdNewClient() to use a new [TargetRpc] decorated function.
    [Command]
    void CmdNewClient()
    {
        TargetShareUpdate(this.connectionToClient, SharedIntExample);
    }

    [TargetRpc]
    void TargetShareUpdate(NetworkConnection target, int newValue)
    {
        SharedIntExample = newValue;
    }
Now each client has the latest value of SharedIntExample, even if it joins after the value has been updated.
Before I figured out how to do this correctly, as above, and by using AssignClientAuthority (from stumbling on http://stackoverflow.com/questions/33469930/how-do-i-sync-non-player-gameobject-properties-in-unet-unity5/35504268). I tried to do it an unnecessarily complex way, which is described below, in strike-through, under "Wrong way of doing it".
Wrong way of doing it
Decide what needs to modify the integer; just the server, just the client, or both the server and the client. If the number is modified on the client: - [Command] should be used to modify the master instance of that number stored on the server.public class NetworkSession : NetworkBehaviour
{
[Command]
public void CmdSetSlide(int toIndex)
{
// update servers version of SlideServer.Instance.SlideIndex
MapStatus.Instance.SlideIndex = toIndex;
}
}
If the number is modified on the server:
- [SyncVar] should be used to update the copy of that number on each client to match what is stored on the server.
public class FindIdentity : MonoBehaviour
{
    void Start()
    {
        networkConn = GameObject.FindObjectsOfType()
            .Where(s => s.isLocalPlayer)
            .FirstOrDefault();
    }

    void Update()
    {
        if (networkConn != null // check if this is a client. networkConn should only be null when this code is running on the server.
            && networkConn.CurrentCity != MapStatus.Instance.CurrentCity)
        {
            onCitySyncVarChanged();
        }
        else
        {
            keyInCity();

            // catch city changes Server side
            if (MapStatus.Instance.CurrentCity != oldCity)
            {
                oldCity = MapStatus.Instance.CurrentCity;

                // update map on the server
                mapOfPois.CurrentMap = MapStatus.Instance.CurrentCity;

                // update city syncVar of all sessions
                foreach (var netSession in GameObject.FindObjectsOfType())
                {
                    Debug.Log("netSession.name)" + netSession.name);
                    netSession.CurrentCity = MapStatus.Instance.CurrentCity;
                }
            }
        }
    }
}
- clients that join late need to have their copy updated to match the server
    ///  Make sure a newly connected client gets the city selection made before they joined
    /// This override only runs on the client when the client has authority, which is after OnStartClient
    public override void OnStartLocalPlayer()
    {
        base.OnStartLocalPlayer();

        Debug.Log("OnStartLocalPlayer " + this.name + " with " + CurrentCity + ". Asking server to update CurrentCity.");
        CmdReconnect();
    }

    [Command]
    public void CmdReconnect()
    {
        Debug.Log("CmdReconnect " + this.name + " with " + CurrentCity + " updated to " + MapStatus.Instance.CurrentCity);

        // uses the servers copy of CurrentCity to update the SyncVar
        CurrentCity = MapStatus.Instance.CurrentCity;
    }
Since the prefab is spawned when a client joins you can't have it easily reference objects already in the scene by dragging gameobjects into fields in the inspector. You can create another gameobject to do this interfacing. It will need to search for the NetworkBehaviour, this is done above in the FindIdentity's Start().
That was the wrong way of doing it. The cleaner alternative of is above the "Wrong way of doing it" title.Friday, September 18, 2015
Unity3D Video/Movie using Sprite frames
Here's an implementation of the Unity project described below.
Here's how to make a sprite behave more like a video:
1. Create a single image for every frame of the movie you'd like to use. I ended up doing 15 frames for every second of movie. One way to extract frames from a movie file is with an ffmpeg command: ffmpeg -i "infile.mp4" -f image2 -vf fps=fps=15 img%03d.jpg
2. (Optional) Make any modifications to the frames. For example, convert them to *.png's with transparency.
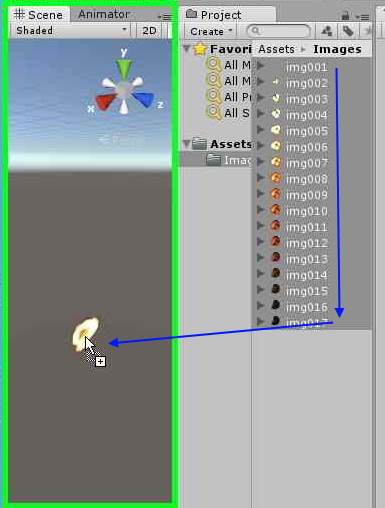
3. Import all the image file frames into your unity project.
4. In Unity's project window, shift-select all of the frames at once to bring up their properties in the inspector.
4.1. Change the Texture Type to "Sprite (2D and UI)"
4.2. Change the Packing Tag to the name of the movie. This name does some behind the scenes optimization by putting all these frames are on a single sprite sheet or image atlas without any other sprites.
4.3. Make sure "Generate Mip Maps" is unchecked. Mip Maps take up space that we won't be using as the sprites will stay the same distance from the camera.
4.4. Press "Apply".

5. From the project window drag the selection of all the frames together into the scene view. This causes Unity's 2D engine to auto-generate an animator and sprite animation using all selected frames.
6. Change the animation to match the FPS you specified in step #1.

Hit the Editors play button you should see your video play.
Full Screen Video
7. Add a camera as a child to the sprite and give it the following settings7.1. Offset it's position from the sprite by setting z-position to -1
7.2. Clear Flags: Depth - this allows other content to be rendered underneath what this camera see's
7.3. Projection: orthographic - using orthographic makes calculating the screen size easier
7.4. Depth: 1 - tells unity to render this camera above the main camera

8. Create ScaleToCamera.cs script
using UnityEngine;

public class ScaleToCamera : MonoBehaviour
{
    public new Camera camera;
    private SpriteRenderer spriteRenderer;

    void Start()
    {
        if (camera == null) camera = Camera.main;

        spriteRenderer = this.GetComponent<SpriteRenderer>();
        if (spriteRenderer != null)
        {
            scaleSprite();
        }
    }

    private void scaleSprite()
    {
        if (camera.orthographic == false)
        {
            Debug.Log(this.name + " can't run ScaleToCamera.cs. Sprite scaling calculation is only implemented for an orthographic camera.");
            return;
        }

        float worldScreenHeight = camera.orthographicSize * 2;
        float worldScreenWidth = worldScreenHeight / Screen.height * Screen.width;

        transform.localScale = new Vector3(
            worldScreenWidth / spriteRenderer.sprite.bounds.size.x,
            worldScreenHeight / spriteRenderer.sprite.bounds.size.y,
            1);
    }
}
8.1. Add ScaleToCamera script to the sprite renderrer to have the video stretch to full screen.8.2. Drag the camera you created in step #7 to the Camera property in the ScaleToCamera component.

Hit the Editors play button you should see your video re-size to the game window and play.
Adding Play/Stop control
9. Turn off looping in the animation file that was automatically generated in step #5.10. In the animator, add an "Idle" or "Stop" empty state. This is the state where the animation won't be playing.
10.1. Right click this state to set it as the default state.
10.2. Set this state to play the same animation file as the other state. 10.3. Set this state's animation play speed to 0. This makes the video always show only the first frame of the video when this state is active.
11. Add 2 Triggers to the animator; "Play" and "Stop"

12. Create a transition from "Idle" to the generated state using the condition "Play", uncheck exit time, set Transition Duration to 0.
13. Create a transition from the generated state back up to "Idle" using the condition "Stop", uncheck exit time, set Transition duration to 0
14. Create a second transition from the generated state back up to "Idle" leaving Exit Time checked, set exit time to 0.99, set Transition duration to 0
15. Add TransitionSprite.cs to the spriteRenderer
using UnityEngine;
using System;

[RequireComponent(typeof(Animator))]
public class TransitionSprite : MonoBehaviour
{
    /// <summary> The sprite animation has stopped playing, either from finishing or from running Stop() </summary>
    public event EventHandler<EventArgs> Finished;

    private Animator cachedAnimator;
    private bool debugToggle;

    void Start()
    {
        cachedAnimator = this.GetComponent<Animator>();
    }

    void Update()
    {
        // Note: this if block is used only for debugging purposes,
        if (Input.GetButtonDown("Fire1"))
        {
            debugToggle = !debugToggle;
            if (debugToggle)
                Play();
            else
                Stop();
        }
    }

    /// <summary> Plays the animation from the start to the end. </summary>
    public void Play()
    {
        cachedAnimator.ResetTrigger("Stop"); // clear stop to make sure the animation won't stop as soon as it starts.
        cachedAnimator.SetTrigger("Play");
    }

    public void Stop()
    {
        cachedAnimator.ResetTrigger("Play"); // clear play to make sure the animation won't play as soon as it stops.
        cachedAnimator.SetTrigger("Stop");
    }

    public void RaiseFinished()
    {
        Debug.Log("Finished playing " + this.name);
        if (Finished != null)
        {
            Finished(this, new EventArgs());
        }
    }
}
16. Add TransitionSpriteBehaviour.cs to the spriteRenderer's animator's generated state.using UnityEngine;
public class TransitionSpriteBehaviour : StateMachineBehaviour
{
// OnStateExit is called when a transition ends and the state machine finishes evaluating this state
override public void OnStateExit(Animator animator, AnimatorStateInfo stateInfo, int layerIndex)
{
var sprite = animator.GetComponent<TransitionSprite>();
if (sprite != null)
{
sprite.RaiseFinished();
}
}
}

Now when you press the Unity3D editor's play button the video won't play until you click in the game window, clicking again will stop the video.
Here's the code above as a Unity project.
Labels: Unity3D
Saturday, March 07, 2015
Interview at Nintendo in Redmond, WA
Sunday, March 02, 2014
Getting started with StrangeIoC
StrangeIoC compared to MVVM in XAML
I come from a XAML background, where MVVM is the popular pattern. Some initial mapping of StrangeIoC to something I'm familiar with helped me get a grasp of its goals. This is how I found MVVM maps to StrangeIoC:Unity3D game objects are the MVVM View, the XAML & Codebehind
StrangeIoC ContextView, Root GameObject & MvcsContext are the binding of the MVVM View to the ViewModel, aka XAML's DataContext
StrangeIoC View and Mediator is the MVVM ViewModel, what's bound to XAML DataContext
StrangeIoC Model/Service is the MVVM Model
How StrangeIoC gets started
The first hook into StrangeIoC is a top level GameObject from the Unity3D Scene Hierarchy. The \examples\Assets\scenes\myfirstproject\TestView.unity example that comes with strange shows this on the "ViewGO" gameobject with its MyFirstProjectRoot.cs component script. The purpose of this Root.cs script is to define and initialize a StrangeIoC context. This is explained with detail in the StrangeIoC How-To. I was looking for something with a little less detail to get started.Building a Unity3D app with rudimentary usage of StrangeIoC
I made a top level Cube gameObject and attached a CubeRoot.cs script to it:using strange.extensions.context.impl;
public class CubeRoot : ContextView
{
void Awake()
{
context = new CubeContext(this);
}
}
The CubeContext is the mapping container for all StrangeIoC objects. It's not used correctly in the code below, as no mapping is done. This usage instead allows you to test that you have StrangeIoC included in your project correctly.using UnityEngine;
using strange.extensions.context.impl;
using strange.extensions.context.api;
public class CubeContext : MVCSContext
{
public CubeContext(MonoBehaviour view) : base(view)
{
view.renderer.material.color = Color.yellow; //verify view loads it's context
}
}
You now have a completed basic framework for StrangeIoC. You can run the project. The cube should change to yellow by using its context.Following a pattern by using injection
The constructor of the context class is not the right place for making modifications to the view. The purpose of the Context is to define mappings between the MVCS layers and to define the scope where GameObjects can send or receive events from other GameObject.The initialization of a GameObject's modifiable properties should be pulled from a model and put into a view. There are views for many GameObjects inside a single context. This should also be represented in the Unity3D Hierarchy by making GameObjects with a view be children of a GameObject with a context. We need a context GameObject in the Unity3D Hierarchy. Our cube either needs a parent empty GameObject with a CubeContext.cs component or to become an empty GameObject and have a child Cube object. We'll also need a new CubeView.cs script. This is what our GameObject Hierarchy should look like:
- Context - Only transform and CubeContext.cs components.
- Cube - Has default cube components along with CubeView.cs script.
using UnityEngine;
using strange.extensions.context.impl;
using strange.extensions.context.api;

public class CubeContext : MVCSContext
{
 public CubeContext(MonoBehaviour view) : base(view) { }

 protected override void mapBindings()
 {
  injectionBinder.Bind().To(Color.red); // map binding to a model
 }
}
For the sake of simplicity, I hijacked the Color datatype, using Color as our Model. The Color type would normally be replaced with a model interface and injected with a model that uses that interface. The CubeView makes use of the bindings defined in CubeContext.cs to inject the CubeColor from the model.using UnityEngine;
using strange.extensions.mediation.impl;
public class CubeView : View
{
[Inject]
public Color CubeColor {get; set;}
protected override void Start()
{
base.Start();
this.renderer.material.color = CubeColor;
}
}
There is much more to StrangeIoC than just these fundamentals. Understanding the flow above will make the StrangeIoC How-To easier to digest. There is also an introductory video on StrangeIoC in this article.Labels: StrangeIoC, Unity3D
Monday, June 10, 2013
Deploying to Android with Unity3D
1. Download the Android SDK Tools, not the ADT Bundle! The SDK is shown under "use an Existing IDE". http://developer.android.com/sdk/index.html
2. Run the SDK Tools.
2.1 If the Android SDK Tools request it, install the 32bit version of the Java Platform Standard Edition JDK. (Installing only the 64bit version causes Unity Error: Error building Player: Win32Exception: ApplicationName='java.exe', CommandLine='-Xmx1024M...) http://www.oracle.com/technetwork/java/javase/downloads/index.html
2.2 You may need to manually set the JAVA_HOME Windows PATH variable https://confluence.atlassian.com/display/CONF26/Set+JAVA_HOME+variable+in+Windows
3. After the Android SDK has been installed be sure to start "SDK Manager.exe" from the installation folder.
3.1 Keep the defaults checked and check any additional Android versions that your older devices are running.
3.2 Click "Install ## packages..." in the lower right.
3.3 Accept the license and install. (It took me about 20 minutes for this to install 13 packages).
3.4 You do not need System Images to create an *.apk with Unity. However, dependencies for System Image packages are now complete, click "Install #packages..." again if you want to use the Android emulator.
3.5 [troubleshooting] If the Android SDK *.exe you downloaded contains r22 in it's file name (and you want to use Unity 4.1.3) you need to copy the contents of the /build-tools/17.0.0/ folder to the /platform-tools/ folder. This was suggested by "jvil" on http://forum.unity3d.com/threads/176737-unknown-error-when-building-simple-scene
4. Start up Unity3D and open Edit -> Preferences...
4.1 Click External Tools
4.2 Click Browse... next to "Android SDK Location"
4.3 Find the same folder that "SDK Manager.exe" is in from step #3 and click "Select Folder".
4.4 exit the Preferences window.
5. Click File -> "Build Settings..."
5.1 Make sure platform "Android" is selected.
5.2 Click "Player Settings..."
5.3 Find the Unity Inspector -> Per-Platform Settings -> Settings for Android -> "Other Settings".
5.4 Set the "Bundle Identifier" and "Minimum API Level".
6. Click File -> "Build Settings..." if you closed it.
6.1 Click Platform "Android".
6.2 Click "Switch Platform"
6.3 Click Build
Additional details for setting up the Android SDK to work with a device and creating a test application: http://blog.rabidgremlin.com/2012/03/10/tutorial-creating-your-first-unity-android-app/
Subscribe to Posts [Atom]